Azure Resource Manager (ARM) revolutionizes the way Azure resources are handled, offering a comprehensive solution for efficient management and deployment. Dive into the world of ARM for a transformative experience in cloud resource management.
As we delve deeper, you’ll uncover the intricacies and advantages of this powerful tool, shaping your understanding of Azure resource management like never before.


Understanding Azure Virtual Networks (VNets)
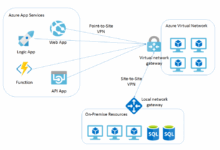
Azure Virtual Networks (VNets) are a fundamental building block in the Azure ecosystem, providing isolated and highly customizable network environments for your Azure resources. They allow you to securely connect and control communication between different resources, both within Azure and to external networks.
Subnets and Network Segmentation
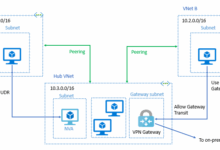
Subnets within Azure VNets enable you to divide your virtual network into smaller segments, each with its own IP address range. This segmentation helps in organizing and securing your resources based on their specific requirements. By assigning resources to different subnets, you can control traffic flow and apply network security policies more effectively.
- When creating a new Azure Virtual Network, you can define multiple subnets with distinct address ranges to accommodate different types of resources.
- Ensure that the subnets are appropriately sized to accommodate the expected number of resources and future growth.
- By strategically configuring subnets, you can optimize network performance and enhance security by isolating sensitive resources.
Configuring Network Security Groups (NSGs)
Network Security Groups (NSGs) act as virtual firewalls that allow you to filter inbound and outbound traffic to and from resources within an Azure Virtual Network. They provide an additional layer of security by defining rules that control the flow of network traffic based on source, destination, and protocol.
- To configure NSGs within an Azure Virtual Network, you can create rules to allow or deny specific types of traffic based on your security requirements.
- It is essential to prioritize rules within NSGs to ensure that the most restrictive rules are evaluated first to prevent unauthorized access.
- Regularly review and update NSG rules to adapt to changing security needs and address any potential vulnerabilities.
ARM Templates
ARM templates are declarative files that define the infrastructure and configuration for Azure resources. They play a crucial role in Azure Resource Manager by enabling the automation of deployment, management, and organization of resources in a consistent and repeatable manner.
ARM templates help in deploying Azure resources by specifying the desired state of the infrastructure, rather than the sequence of steps needed to achieve that state. This allows for faster and more reliable deployment processes, reducing the potential for human error.
Furthermore, ARM templates aid in managing Azure resources by providing a centralized way to define and update configurations across multiple resources. This ensures consistency and compliance with organizational standards.
Organizing Azure resources is also simplified with ARM templates, as they allow for grouping related resources together within the same template file, making it easier to manage and maintain the infrastructure.
ARM Template Structure and Syntax
ARM templates are written in JSON (JavaScript Object Notation) format and consist of several key components:
– Resources: Define the Azure resources to be deployed, along with their properties and dependencies.
– Parameters: Input values that can be customized during deployment, such as resource names or sizes.
– Variables: Define reusable values within the template, making it easier to manage configurations.
– Outputs: Display information after deployment, such as resource endpoints or connection strings.
– Functions: Built-in functions that can be used to manipulate values or perform calculations within the template.
Overall, ARM templates provide a powerful mechanism for automating and orchestrating Azure resources, promoting efficiency, consistency, and scalability in cloud deployments.
Resource Groups in ARM
Resource groups in Azure Resource Manager (ARM) are logical containers that help organize and manage related Azure resources. They serve as a way to group resources that share the same lifecycle, permissions, policies, and management tasks.
Resource groups help in grouping and managing related Azure resources by providing a way to manage these resources collectively. Some key purposes and benefits of resource groups include:
– Simplifying resource management: By grouping related resources together, it becomes easier to manage and monitor them as a single unit.
– Applying policies and access controls: Resource groups allow you to apply policies and permissions at the group level, ensuring consistency across all resources within the group.
– Organization and categorization: Resource groups enable you to organize resources based on projects, environments, departments, or any other criteria that make sense for your organization.
Best Practices for Organizing Resources within Resource Groups
- Group resources based on their lifecycle: Consider grouping resources that are created, updated, and deleted together to simplify management.
- Use naming conventions: Adopt a consistent naming convention for resource groups to easily identify their purpose and contents.
- Keep resource groups small: Avoid creating resource groups with too many resources to maintain clarity and organization.
- Use tags for further categorization: Utilize tags to add additional metadata to resources within a group for better organization and management.
- Consider resource dependencies: Understand dependencies between resources and group them accordingly to ensure smooth operations.
Deployment Models in ARM
When it comes to deploying resources in Azure, there are two main models that are commonly used – the classic deployment model and the Azure Resource Manager (ARM) deployment model. Let’s take a closer look at how these two models compare and contrast, as well as the benefits of using ARM over the classic model.
The classic deployment model in Azure is the older method of deploying and managing resources. In this model, resources are deployed individually and managed separately. This can lead to challenges in managing dependencies between resources and tracking the overall deployment. On the other hand, the Azure Resource Manager (ARM) deployment model is a newer approach that allows you to deploy, manage, and monitor all the resources for your solution as a group, rather than individually.
Comparison of Deployment Models
- In the classic model, resources are deployed individually, while in ARM, resources are deployed and managed as a group within a resource group.
- ARM provides more control and visibility over the entire deployment process compared to the classic model.
- With ARM, you can define the dependencies between resources, making it easier to manage complex deployments.
Benefits of Using ARM Deployment Model
- Improved management: ARM allows you to manage resources as a group, making it easier to track dependencies and manage the deployment process.
- Resource grouping: ARM uses resource groups to organize and manage related resources together, providing a more structured approach to resource management.
- Template-based deployment: ARM templates enable you to define your infrastructure as code, making it easier to repeat deployments and ensure consistency across environments.
Scenarios for Each Deployment Model
- Classic Deployment Model: This model may be more suitable for simple deployments where there are no dependencies between resources and individual management is preferred.
- ARM Deployment Model: The ARM model is ideal for complex deployments with multiple interdependent resources that need to be managed as a group. It is also beneficial for scenarios where infrastructure as code is preferred for repeatable and consistent deployments.
Role-Based Access Control (RBAC) in ARM
Role-Based Access Control (RBAC) is a crucial feature in Azure Resource Manager that allows organizations to manage access to Azure resources effectively. By assigning roles to users or groups, RBAC helps in controlling who can perform specific actions within the Azure environment.
Importance of RBAC in Azure Resource Manager
RBAC ensures that only authorized users have access to resources, reducing the risk of unauthorized access and potential security breaches. It simplifies permission management by providing predefined roles with specific sets of permissions, making it easier to assign and control access levels.
How RBAC Helps in Managing Access to Azure Resources
RBAC enables organizations to assign roles such as Owner, Contributor, Reader, and Custom roles to users or groups based on their responsibilities. Each role comes with a specific set of permissions that determine what actions a user can perform on Azure resources.
Examples of Different Roles and Permissions in RBAC
– Owner: Full access to all resources, including the ability to manage access.
– Contributor: Can create and manage all types of Azure resources, but cannot grant access to others.
– Reader: View-only access to resources without the ability to make any changes.
Creating Custom Roles in Azure using RBAC
To create custom roles in Azure, users can define the specific permissions required for a role and assign it to users or groups. This allows organizations to tailor access levels according to their unique requirements.
Steps to Assign Roles in Azure Resource Manager
1. Navigate to the Azure portal and select the resource group or resource.
2. Click on “Access control (IAM)” and then “Add role assignment.”
3. Choose the role to assign, select the user or group, and save the assignment.
Comparison with ACL (Access Control List)
RBAC operates on the principle of assigning roles to users or groups, whereas ACL works by defining access control lists for individual resources. RBAC provides a more centralized and scalable approach to access control compared to ACL.
Built-In Roles in Azure RBAC
| Role | Permissions |
|---|---|
| Owner | Full access to all resources |
| Contributor | Can create and manage Azure resources |
| Reader | View-only access to resources |
Resource Locks in ARM
Resource locks in Azure Resource Manager are a crucial feature that helps prevent accidental deletion or modification of Azure resources. By applying resource locks, you can add an extra layer of protection to your critical resources, ensuring they remain secure and available.
Resource locks come in two different types: CanNotDelete and ReadOnly. The CanNotDelete lock prevents users from deleting a resource, while the ReadOnly lock allows users to view the resource, but they cannot delete or update it. These locks can be applied at the resource group level or individual resource level, providing flexibility in protecting your resources based on specific requirements.
Types of Resource Locks
- CanNotDelete: This lock prevents deletion of the resource, ensuring it remains intact and operational.
- ReadOnly: Users can view the resource but are restricted from making any changes to it, maintaining its integrity.
Scenarios for Resource Locks
- Preventing accidental deletion: By applying a CanNotDelete lock to critical resources such as production databases or virtual machines, you can avoid unintentional deletions that could lead to data loss or service disruptions.
- Protecting configuration settings: Implementing a ReadOnly lock on key resources like network security groups or storage accounts ensures that their configurations remain unchanged, maintaining the stability of your infrastructure.
Tagging Resources in ARM
In Azure Resource Manager (ARM), tagging resources plays a crucial role in effectively organizing and managing resources. Tags are key-value pairs that provide metadata to resources, enabling users to categorize and track their resources efficiently.
Adding Tags to Azure Resources in ARM
When adding tags to Azure resources in ARM, follow these steps:
- Go to the Azure portal and select the resource you want to tag.
- Navigate to the ‘Tags’ section of the resource.
- Click on ‘Add tag’ and enter the key-value pairs for your tag.
- Save the tags to apply them to the resource.
Benefits of Leveraging Tags in Azure
Utilizing tags in Azure provides several benefits, including:
- Cost Management: Tags help in tracking costs by categorizing resources based on different criteria.
- Resource Tracking: Tags allow for easy identification and tracking of resources, simplifying management.
Comparison Between Resource Groups and Tags
Resource groups in ARM are used to logically group resources, while tags provide additional metadata for further organization and categorization.
Impact of Tagging on Resource Monitoring and Compliance
Proper tagging enhances resource monitoring and compliance within Azure Resource Manager by providing detailed information about each resource, enabling better visibility and control.
Real-World Scenarios of Proper Tagging
In real-world scenarios, proper tagging has improved resource governance and visibility in Azure by:
- Enabling cost allocation and tracking for specific departments or projects.
- Facilitating compliance audits by providing detailed information about resources and their usage.
Monitoring and Logging in ARM
Monitoring and logging are essential features offered by Azure Resource Manager (ARM) to help users track resource changes, troubleshoot issues, and ensure the overall health and performance of their resources.
Monitoring Capabilities in ARM
- Azure Monitor: Azure Monitor provides a comprehensive solution for collecting, analyzing, and acting on telemetry data from Azure and on-premises environments.
- Metrics: ARM allows users to collect and visualize metrics to gain insights into the performance and usage of their resources.
- Alerts: Users can set up alerts based on metrics to proactively monitor the health of their resources and take action when predefined conditions are met.
Logging Capabilities in ARM
- Azure Log Analytics: Azure Log Analytics offers a centralized repository for storing and analyzing logs generated by Azure resources, allowing users to track and troubleshoot issues effectively.
- Diagnostics Logs: ARM enables users to configure diagnostic settings to collect logs and metrics from their resources, providing visibility into resource activities and performance.
Tools and Services for Monitoring in ARM
- Application Insights: Application Insights helps monitor the performance and usage of applications hosted in Azure, providing deep insights into application behavior and performance.
- Azure Security Center: Azure Security Center offers security monitoring and threat detection capabilities to help users protect their resources from potential security threats.
- Azure Advisor: Azure Advisor provides personalized recommendations to optimize resource usage, improve security, and ensure high availability based on best practices.
Resource Policies in ARM
Resource policies in Azure Resource Manager (ARM) are a set of rules and regulations that can be defined to enforce specific requirements or restrictions on Azure resources within a subscription. These policies play a crucial role in maintaining compliance and governance standards by ensuring that resources deployed in Azure adhere to organizational guidelines and best practices.
Significance of Resource Policies
Resource policies help organizations enforce security, compliance, and operational standards across their Azure environment. By defining policies, administrators can prevent users from creating resources that do not meet specific criteria, such as requiring encryption on storage accounts or restricting certain resource types.
- Resource policies ensure consistency and adherence to organizational standards.
- They help in preventing misconfigurations and security vulnerabilities.
- Resource policies support governance by enforcing rules for resource creation and management.
Examples of Policy Definitions
Resource policies can be defined using JSON-based policy definitions, which specify the conditions that resources must meet or the actions that are allowed or denied. Here are some examples of policy definitions:
– Enforce a naming convention for virtual machines.
– Restrict the creation of public IP addresses in specific regions.
– Require specific tags on all resources for better resource management.
These policy definitions can be applied at different scopes within Azure, such as the subscription level, resource group level, or individual resources. By associating policies with these scopes, organizations can ensure that their Azure environment remains compliant and secure.
Extending ARM with Azure Blueprints
Azure Blueprints are a powerful tool that extends the capabilities of Azure Resource Manager by providing a declarative way to orchestrate the deployment of various Azure resources. It allows organizations to define a repeatable set of resources that adhere to organizational standards, compliance requirements, and best practices.
Benefits of Azure Blueprints
Azure Blueprints offer several benefits for managing and deploying cloud environments:
- Enforce compliance: Ensure that all environments are deployed in a compliant manner by defining standardized configurations.
- Streamline deployment: Simplify the process of deploying resources by providing a predefined set of artifacts and configurations.
- Reduce errors: Minimize human errors by automating the creation of environments based on a blueprint.
- Enable governance: Establish governance controls by setting role-based access and resource policies within the blueprint.
Examples of Azure Blueprints Usage
Azure Blueprints can be used to create reusable environments and artifacts such as:
- Standardized virtual networks with predefined configurations.
- Role-based access control settings for various Azure resources.
- Pre-configured Azure policies for enforcing compliance.
Role of Azure Blueprints in Infrastructure as Code (IaC)
Azure Blueprints play a crucial role in Infrastructure as Code practices by allowing organizations to define their infrastructure and configuration settings as code. This enables consistent, repeatable deployments and ensures that infrastructure changes are tracked and version controlled.
Creating a New Azure Blueprint
To create a new Azure Blueprint from scratch, the following steps are involved:
- Define the artifacts: Identify the Azure resources, policies, RBAC settings, and other configurations that will be included in the blueprint.
- Create the blueprint definition: Use the Azure Portal or Azure CLI to define the blueprint structure, including artifacts, parameters, and versions.
- Assign the blueprint: Assign the blueprint to a subscription, resource group, or management group to enforce its configurations on the specified scope.
Integrating ARM with Azure DevOps
Azure DevOps provides a seamless way to integrate with Azure Resource Manager (ARM) for efficient deployment and management of resources. By setting up a service connection and leveraging ARM templates, teams can automate deployments, ensure consistency, and streamline the infrastructure as code process within Azure DevOps pipelines.
Setting Up Service Connection in Azure DevOps
In Azure DevOps, a service connection acts as a bridge between the DevOps environment and Azure resources. To link Azure DevOps with ARM for deployment, follow these steps:
- Create a new service connection in Azure DevOps.
- Choose “Azure Resource Manager” as the connection type.
- Authenticate with your Azure subscription credentials.
- Select the specific Azure subscription and resource group to connect.
- Save the connection for future use in deployment pipelines.
Role of ARM Templates in DevOps Pipelines
ARM templates play a crucial role in defining the infrastructure as code within Azure DevOps pipelines. These templates describe the desired state of Azure resources and configurations, enabling consistent deployments across different environments. By including ARM templates in DevOps pipelines, teams can automate the deployment process and maintain version-controlled infrastructure.
Triggering ARM Deployment in Azure DevOps
To trigger an ARM deployment using Azure DevOps Release Pipelines:
- Create a new release pipeline in Azure DevOps.
- Add the necessary tasks to deploy ARM templates.
- Link the release pipeline to the appropriate service connection.
- Configure triggers for automatic or manual deployments.
- Execute the release pipeline to deploy resources using ARM templates.
Parameterizing ARM Templates for Different Environments
In Azure DevOps, parameterizing ARM templates allows teams to customize deployments for various environments such as development, staging, and production. By defining parameters within the templates, users can input specific values during deployment, ensuring flexibility and consistency across different environments.
Best Practices for Version Controlling ARM Templates
To effectively version control ARM templates in Azure DevOps Repos:
- Store ARM templates in a dedicated repository within Azure DevOps.
- Use branching strategies to manage different versions of templates.
- Leverage pull requests for code review and approval processes.
- Utilize tags and labels to track changes and releases.
- Implement automated testing to validate template changes before merging.
Validating ARM Templates with Azure DevOps Pipelines
Using Azure DevOps pipelines to validate ARM templates before deployment ensures the accuracy and reliability of infrastructure changes. By incorporating validation tasks in the pipeline, teams can identify errors, validate configurations, and prevent potential issues during deployment, enhancing the overall stability of the deployment process.
Azure Resource Manager vs. Azure Portal
When comparing Azure Resource Manager (ARM) and the Azure Portal, it’s important to understand the distinct functionalities each offers in managing Azure resources efficiently. While the Azure Portal provides a user-friendly interface for visual management of resources, ARM serves as a powerful tool for automating deployment, management, and organization of Azure resources.
Functionality Comparison
- Azure Resource Manager (ARM): Enables infrastructure as code (IaC) capabilities through ARM templates, allowing for automated provisioning and deployment of resources.
- Azure Portal: Offers a graphical interface for manual resource management, providing visibility and control over Azure resources.
Advantages of Using ARM
- Automation: ARM allows for automation of resource deployment and management through templates, ensuring consistency and efficiency.
- Scalability: With ARM, you can easily scale resources up or down based on demand, optimizing resource utilization.
- Version Control: ARM templates provide version control for infrastructure changes, facilitating tracking and rollback if needed.
Scenarios for ARM Efficiency
- Large-Scale Deployments: When deploying a large number of resources or complex infrastructures, ARM templates streamline the process and reduce manual errors.
- Repetitive Tasks: For tasks that require repetitive provisioning or configuration, ARM automation can save time and effort compared to manual operations in the Azure Portal.
- Compliance and Governance: ARM’s role-based access control (RBAC) and resource policies help enforce compliance and governance standards across Azure resources more effectively than manual configurations in the Azure Portal.
Azure Resource Manager (ARM) Best Practices
When working with Azure Resource Manager (ARM), it is essential to follow best practices to optimize performance, security, and efficiency of your resources. By adhering to these guidelines, you can ensure a smooth deployment and management process within your Azure environment.
Best Practices for ARM:
- Organize Resources into Resource Groups: Grouping resources based on their function or lifecycle can help you manage and monitor them more effectively.
- Use ARM Templates for Infrastructure as Code: Leveraging ARM templates allows you to automate resource deployment and maintain consistency across environments.
- Implement Role-Based Access Control (RBAC): Assigning permissions based on roles helps control access to Azure resources and enhances security.
- Leverage Resource Locks: Applying locks to critical resources can prevent accidental deletion or modification, ensuring resource integrity.
- Utilize Tagging for Resource Organization: Tagging resources with metadata can facilitate resource management, cost tracking, and governance.
- Monitor and Log Resource Activities: Monitoring resource performance and logging activities can help you identify issues and optimize resource usage.
- Enforce Resource Policies: Implementing policies can enforce compliance requirements, security standards, and governance controls within your Azure environment.
- Extend ARM with Azure Blueprints: Azure Blueprints allow you to define and deploy a repeatable set of resources, policies, and roles across subscriptions.
- Integrate ARM with Azure DevOps: Integrating ARM with Azure DevOps enables continuous integration and deployment (CI/CD) pipelines for efficient resource management.
- Understand the Differences between ARM and Azure Portal: Differentiate between ARM concepts and Azure Portal interactions to effectively utilize both interfaces for resource management.
Disaster Recovery and High Availability in ARM
Disaster recovery and high availability are crucial aspects of any IT infrastructure, especially in the cloud environment. Azure Resource Manager (ARM) plays a significant role in ensuring business continuity and resilience for Azure resources.
Role of ARM in Business Continuity
- ARM helps in orchestrating the deployment and management of resources in Azure, allowing for consistency and repeatability in disaster recovery plans.
- It enables the creation of resource groups to logically organize related resources, making it easier to manage and recover in case of failures.
- ARM templates provide a way to define infrastructure as code, facilitating the quick deployment of resources for recovery purposes.
Features Supporting Disaster Recovery in ARM
- Resource Locks: Prevent accidental deletion or modification of critical resources during a disaster by applying locks at different levels.
- Tagging Resources: Tagging resources with metadata allows for better categorization and identification of components for recovery.
- Monitoring and Logging: Monitoring and logging capabilities in ARM help in tracking resource performance and detecting issues early for proactive disaster recovery.
High Availability Implementation with ARM for Virtual Machines
- Create an availability set to distribute VMs across multiple fault domains and update domains for improved resilience.
- Utilize Azure Load Balancer in conjunction with availability sets to ensure continuous availability and load balancing of traffic.
- Configure auto-scaling based on metrics to handle fluctuations in workload and maintain performance during peak times.
Integration of Azure Site Recovery with ARM
- Azure Site Recovery can be integrated with ARM to orchestrate the replication and failover of VMs and other resources to a secondary Azure region for disaster recovery.
- By defining Recovery Time Objective (RTO) and Recovery Point Objective (RPO) in Azure Site Recovery, organizations can establish clear goals for recovery processes.
Limitations and Considerations in ARM
When working with Azure Resource Manager (ARM), it is essential to be aware of potential limitations and considerations that may impact your deployment and management of resources. By understanding these challenges and best practices, you can optimize your usage of ARM and avoid common pitfalls.
Optimizing Resource Utilization and Cost Management
- One common challenge in ARM is optimizing resource utilization to minimize costs. Careful planning is required to ensure that resources are not over-provisioned or underutilized.
- By leveraging features such as scaling and auto-scaling in ARM, you can dynamically adjust your resources based on demand, leading to cost savings and improved performance.
- Implementing resource tagging and monitoring tools can help track resource usage and identify opportunities for cost optimization.
Automating Resource Deployment with ARM Templates
- ARM templates play a crucial role in automating resource deployment and management in Azure. They allow you to define the configuration of your resources in a declarative format, enabling consistent and repeatable deployments.
- When using ARM templates, it is important to follow best practices such as modularizing your templates, parameterizing values, and versioning your templates to ensure maintainability and scalability.
- By leveraging ARM templates effectively, you can streamline your deployment processes, reduce human error, and enforce governance policies across your resources.
Closing Summary
In essence, Azure Resource Manager (ARM) stands as a cornerstone for streamlined resource management, paving the way for enhanced efficiency and organization within the Azure ecosystem. With its array of features and capabilities, ARM truly defines the future of cloud resource management.